How to dual boot windows 10 and kali linux (Detailed Guide for biginners)
In this noob-friendly guide, you’re going to learn how you can dual boot windows 10 and Kali Linux on your laptop,
with this complete guide, you’ll be able to dual boot Kali Linux and Windows 10 and moreover, we’ll also cover all the errors that might occur on your laptop while dual booting. so this guide is specially made for those who are dual booting for the first time.
though you can do the dual booting process without even knowing the basics and understanding all the terms, it’s always better to know the basics,
so let’s start with dual boot.
Table of Contents
What is dual booting/multi-booting (aka Dual boot)?
Using two operating systems on one computer can be quite handy especially when you’re just starting your journey to becoming a hacker, and aren’t very familiar with other OS except of course windows, or maybe you want to use a specific application that isn’t available on your operating system,
And for such situations, the dual boot comes in the help, though you can also use a method called “virtualization”(using both OS at the same time) which well see later.
dual booting, generally known as dual boot is a process of installing two operating systems on one computer. and being able to choose any one of those two OS at any time.
Multi-booting is the act of installing multiple operating systems on a computer, and being able to choose which one to boot. The term dual-booting refers to the common configuration of specifically two operating systems.
source: Wikipedia
multi-booting and dual booting, both are quite similar, the key difference between both of them is, dual-booting involves only two OS whereas multi-booting involves multiple operating systems.
Why choose kali Linux for dual-boot?
If you are in your journey of becoming a hacker, then kali Linux is a must-have operating system,

to become a hacker, you must become familiar with Linux OS because it has thousands of hacking and penetration testing tools,
Kali Linux is a Debian-derived Linux distribution designed for digital forensics and penetration testing. It is maintained and funded by Offensive Security source: Wikipedia
Kali Linux is an open-source(means it can be downloaded and used for free) operating system that can be installed on a computer if you have 4GB or more RAM (recommended) and a minimum of 20 GB free disk space.
Advantages and Disadvantages of having two OS
Different operating systems have different uses and advantages. Having more than one operating system installed allows you to quickly switch between two and have the best tool for the job. It also makes it easier to dabble and experiment with different operating systems.
source: howtogeek
the single biggest disadvantage of keeping two operating systems is that it will affect your RAM, especially when you have only 4gb of RAM.
and it may make your computer slow,
moreover, it will take 20-30gb of extra space in your hard disk (for the other OS). and the dual boot is time consuming compared to
dual boot vs virtual machine
both dual boot and the virtual machine does the same work that is, they allow you to use two operating systems on one computer,
but the biggest difference between the virtual machine and the dual boot is that through dual boot you can use only one operating system at a time whereas with the help of virtual box you use both operating systems at the same time but virtually,
It means one of your operating systems will be primary whereas the other one would be used virtually through virtual box.
now you might be thinking that Heck virtual box is far better than dual boot since through virtual box I can use both OS at the same time,
it depends upon several factors,
you can stick with virtual box only if you have a powerful computer with good RAM because it takes too much RAM and you need a better computer to run virtual box, especially when you’re virtualizing heavy Operating Systems such as Windows 10, Mac OS, etc
Otherwise, dual boot is ideal for you.
Always take backup first
before doing such operations on your computer it’s always good to take the backup of your files, because if anything goes wrong or you did any mistake while dual booting process or made any mistakes in the process than you can face such situation where there would be no option but to format the computer.
rarely these kinds of things happen but to be on a safer side take a backup of your computer though you may leave the idea of creating the backup if you don’t have any important files on your computer.
preparing the installation
requirements for dual boots:
- A PC/Laptop
- 4GB Pendrive (Minimum)
- Windows 10 OS (already installed)
- Kali Linux OS (latest version) → Get It Now
- Rufus → Get It Now
- Some Patience (not kidding)
Also Read:
- What is product key for windows 10 everything you need to know
- What is prefetch in windows 10? super-simplified
- What is service host superfetch? and why you shouldn’t disable superfetch?
So how to dual boot windows 10 and Kali Linux? (start the process)
process is quite simple, in short, you will first need to make a bootable USB of kali and then make a new partition for Kali installation,
in this guide, we will use only a single drive for the installation, That means we will install and dual boot Kali Linux on one HDD by making a new partition in HDD.
you also need to check how your PC boots(UEFI or Legacy) and make sure both OS are installed in the same model. which we will see later in this post.
so let’s get started, shall we?
step 1:
First, download Kali Linux latest version ISO/image file from here
you would find two versions of Kali Linux one is for 32bit and another one is for 64 bit.
select the appropriate version for your computer.
if you don’t know whether you pc is 32 bit or 64 bit,
simply go to Control Panel\System and Security\System and check your version which will be in system type section.
and according to this download the right version.
step 2:
now you need to make a bootable USB and for that, first, you would need a USB pen drive minimum of 4GB or more (preferred).
second, you’ll have to install Rufus (it’s an application, that helps you to create bootable USB flash drives.
So download it from the above link and install it.
now plug the USB pen drive to your computer, and format the USB, now open the Rufus application, here you will see a page like this,
now before doing anything, you need to know two things about your computer,
first, you have to know how your pc boots up, is that, does it boot up in UEFI or Legacy and make sure both OS is installed in the same model.
First, you have to check whether disk usages in your windows 10 is GPT or MBR?
how to check if your windows 10 have GPT or MBR partition?
both GPT (GUID Partition Table) and MBR (master boot record) are two different ways to store the partition table on a drive.
to check if yours is GPT or MBR
open command prompt
Type the following two commands, pressing Enter after each one:
- diskpart
- list disk
You will see a table listing the disks. If a disk is GPT, it will have an asterisk (* character) under the “Gpt” column. If it is an MBR disk, it will be blank under the Gpt column.
source: techlila
now,
how to check if Windows 10 is using UEFI or LEGACY?
- open cmd
- type MSInfo32 and hit enter
- now in the right side, you’ll see BIOS MODE: (UEFI/LEGACY)
now if your drive usages GPT select GPT otherwise select MBR, in the Rufus partition scheme.
now select the iso file of Kali Linux which you’ve downloaded before (if it’s in zip file extract it).
and click start,
If you’re having any trouble in creating Kali Linux bootable USB, then refer to this post.
step 3:
Now we are going to make a separate partition for the Kali Linux installation.
so open cmd and run this command “diskmgmt.msc”
it will take you to disk management,
and there create a new partition of size 15-20GB(30GB recommended) minimum by shrinking an existing volume, for that select any partition and right click and choose shrink volume, that’s it and then hit enter.
step 4 :
now all the main steps have been completed, Now restart your computer and go to the boot manager and select the option boot as USB,
Then you’ll see the bootloader menu for the Kali Linux,
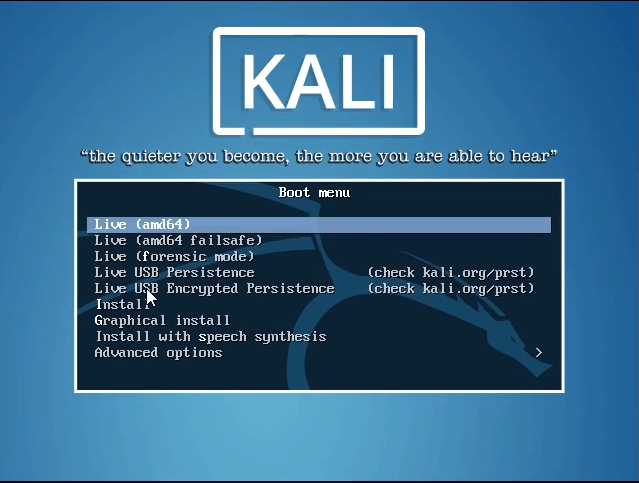
there you’ll find many options to install Kali Linux. Here you have to select “Graphical Install”.
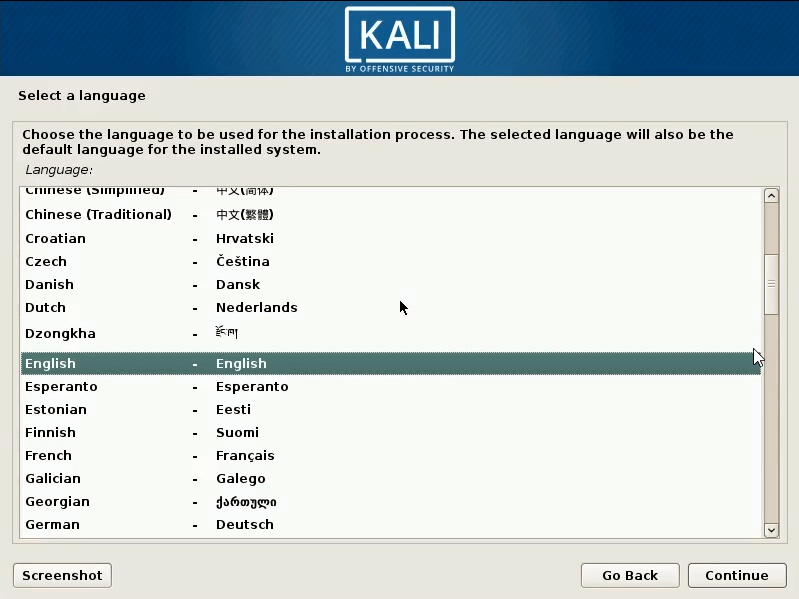
now choose the language to be used for the installation process. And click “Continue”
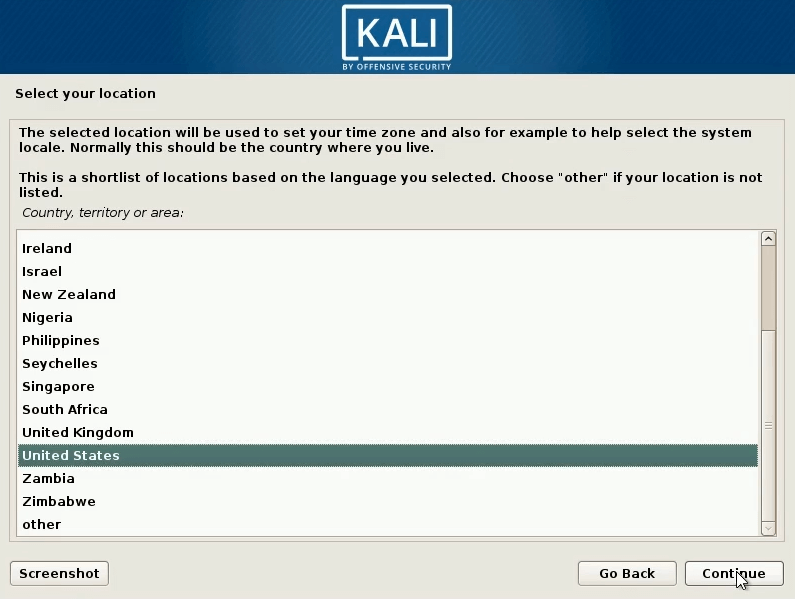
Choose your country and continue the installation process.
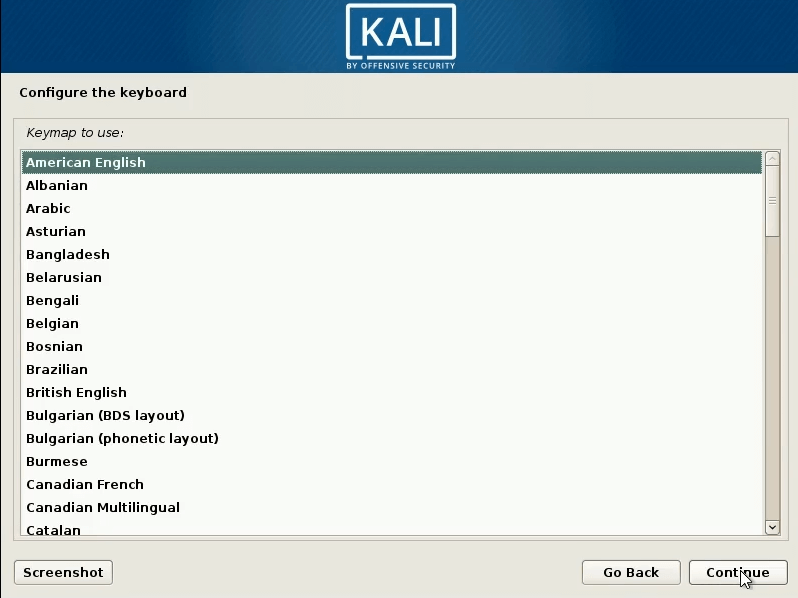
Next set type of keyboard layout. Here I’ve chosen “American English”.
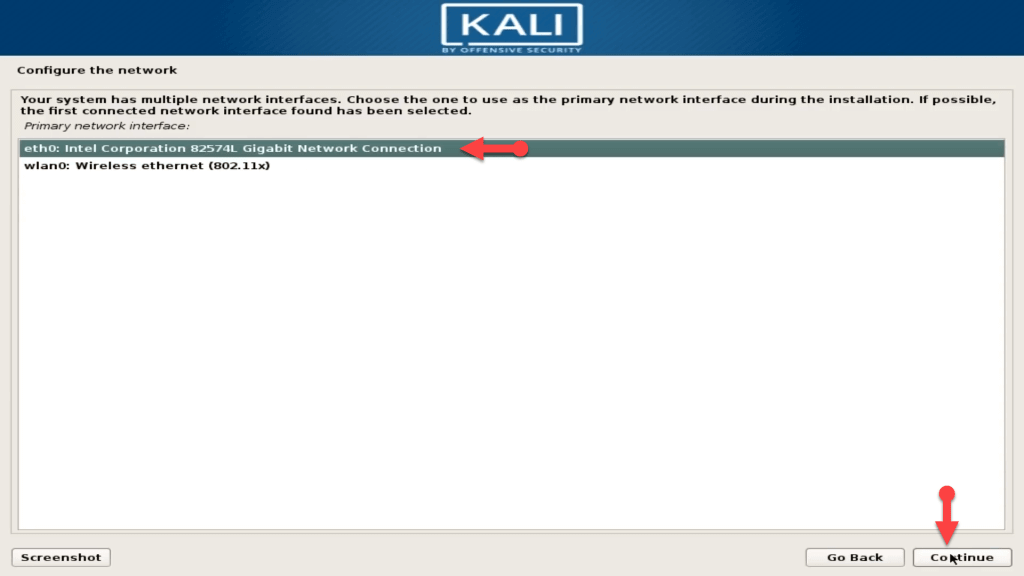
now it’ll ask you to Configure the Network of your system, don’t stress too much here just choose the primary network interface, “the first one” and continue.
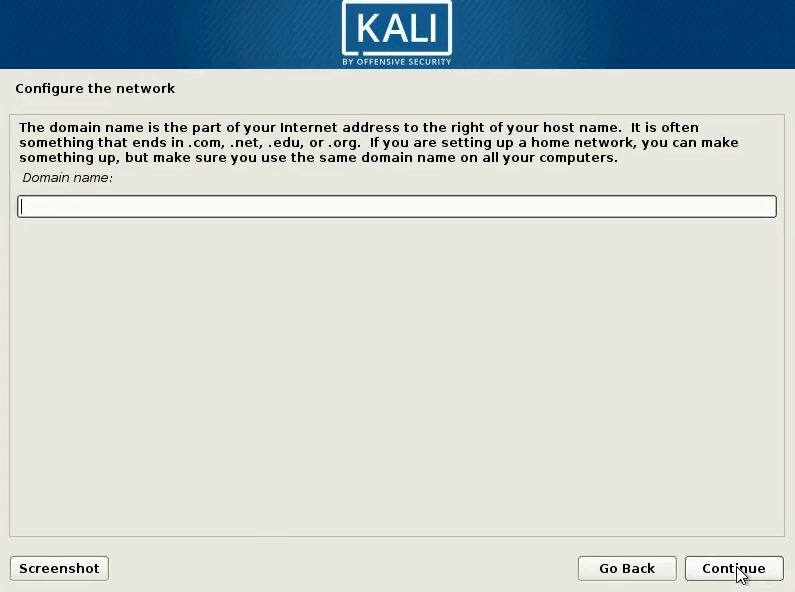
if you get this leave it blank and continue.
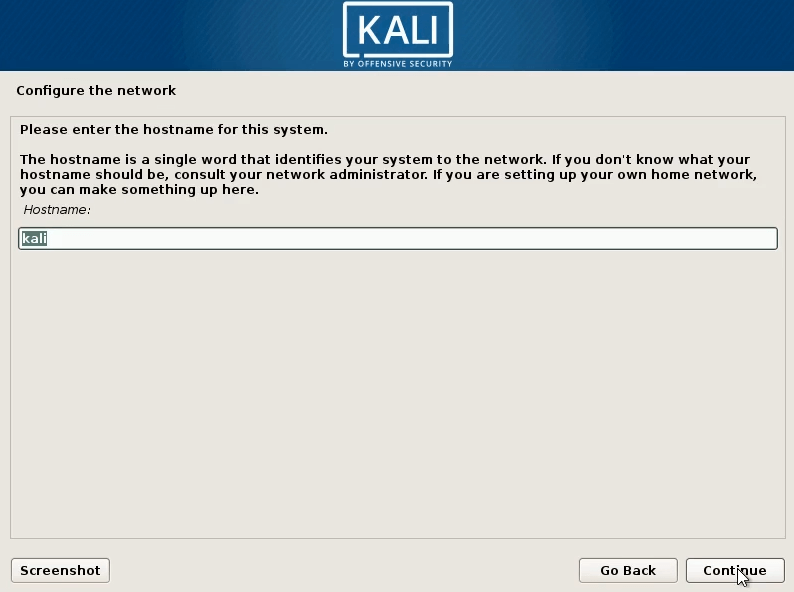
next on this screen, you’ve to enter the hostname(username) for Kali. You can leave the name by default or enter the desired name.
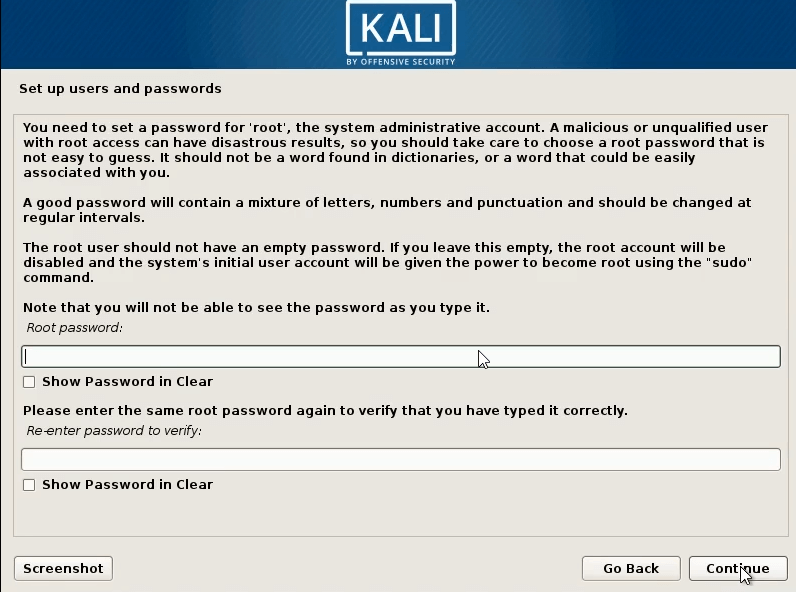
Now we need to set up a password for our root account(important step, memorize or write down the password because kali Linux will ask you for the password at login page).
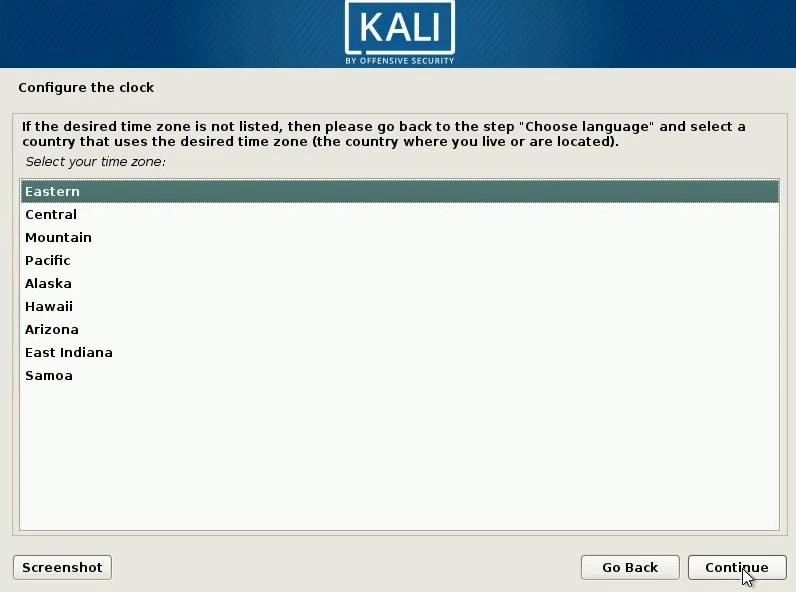
Here we need to choose our timezone.
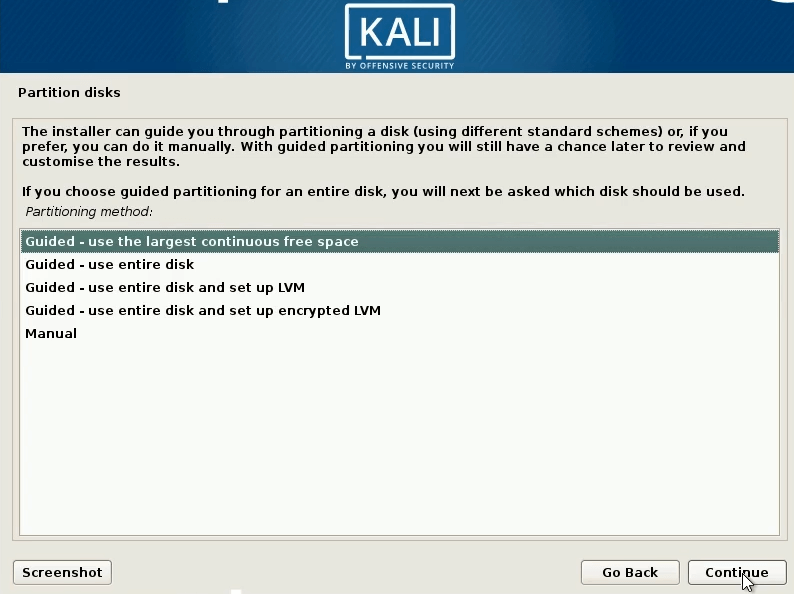
here it is asking how we are going to format disks and partitions? this screen, choose the last option – manual. So, select the manual option and continue.
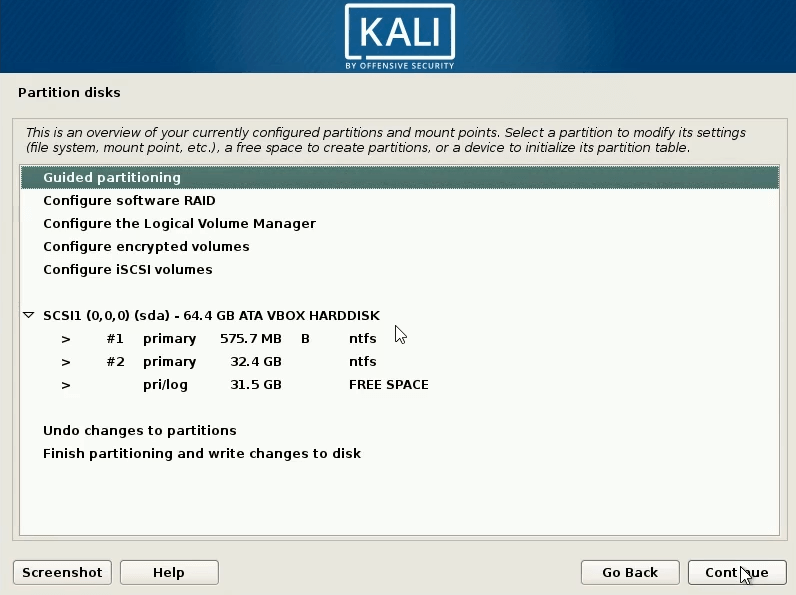
This screen will show all your partitions. The last partition will have the label free space. That’s the new partition we created and now we are going to use that. Select the partition with the label free space and continue.
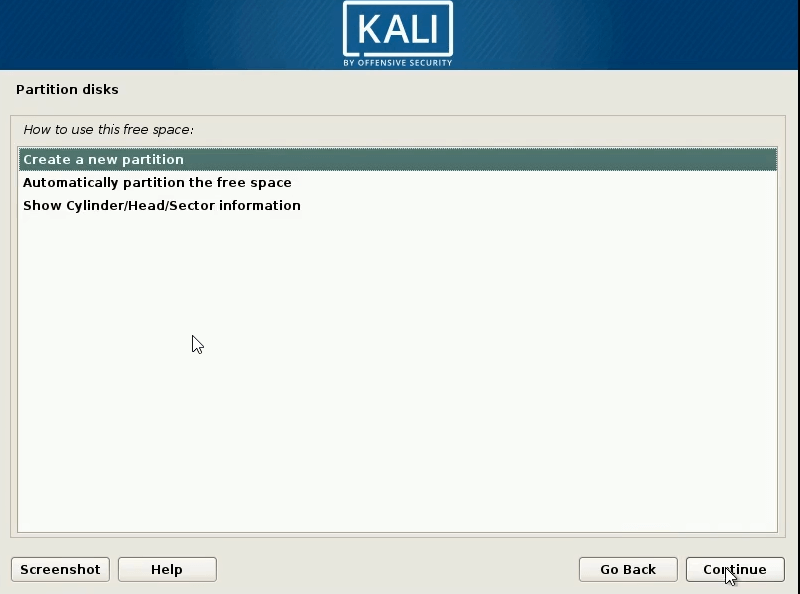
select create a new partition and continue.
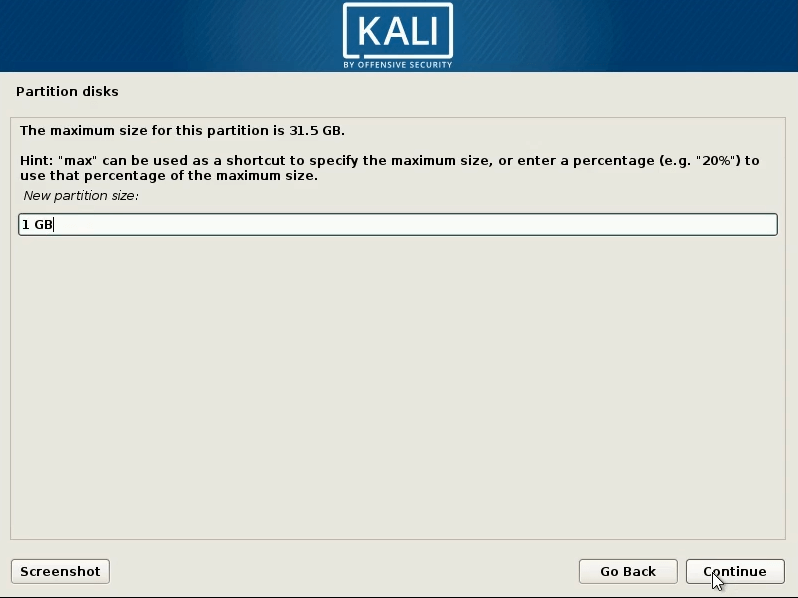
next, we need to create a swap partition, so we will not use up all the disk space of the new partition. In the field partition size, enter 1 GB. This will create a partition of 1 gigabyte which is enough for our swap partition.
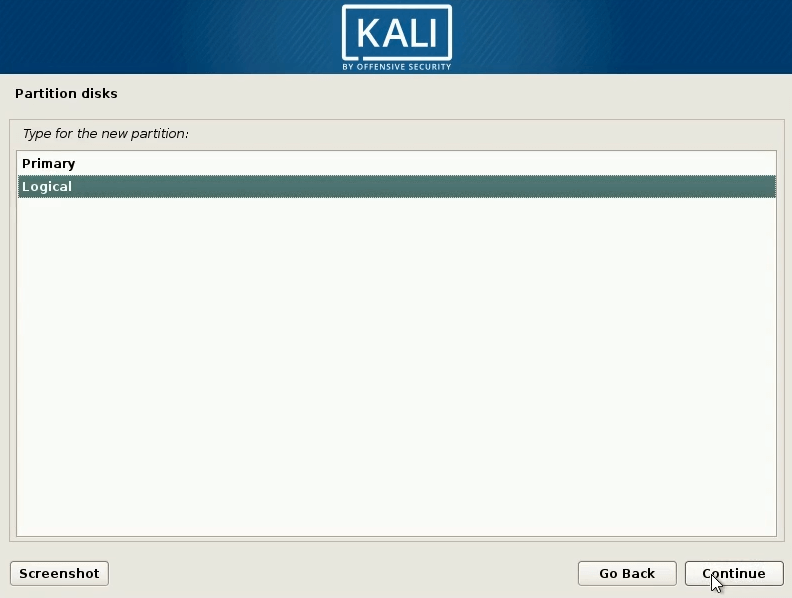
select option “logical” and continue.
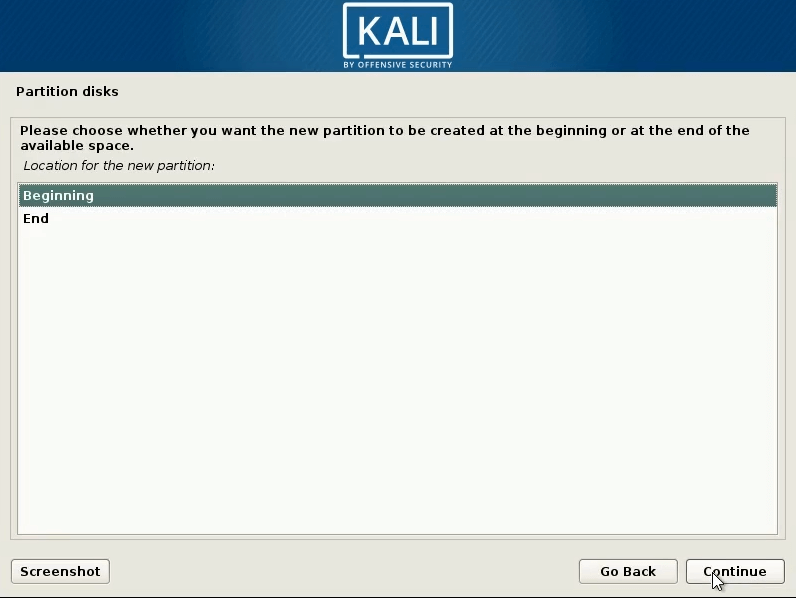
select option Beginning and continue.
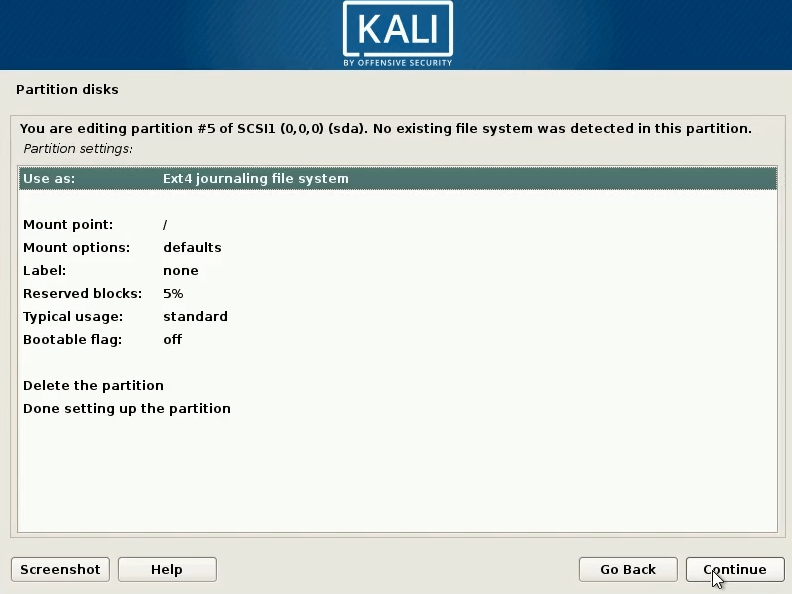
Now we have to edit the partition screen. Here we have to change a couple of things first before we continue. On the first selection, it says “Use as“. Double click on that selection to go into that screen.
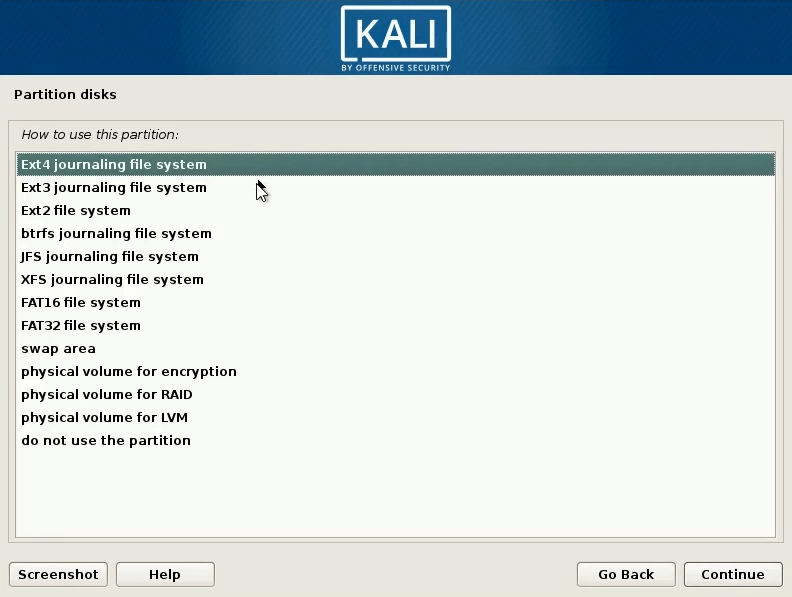
here select the option swap area. and continue.
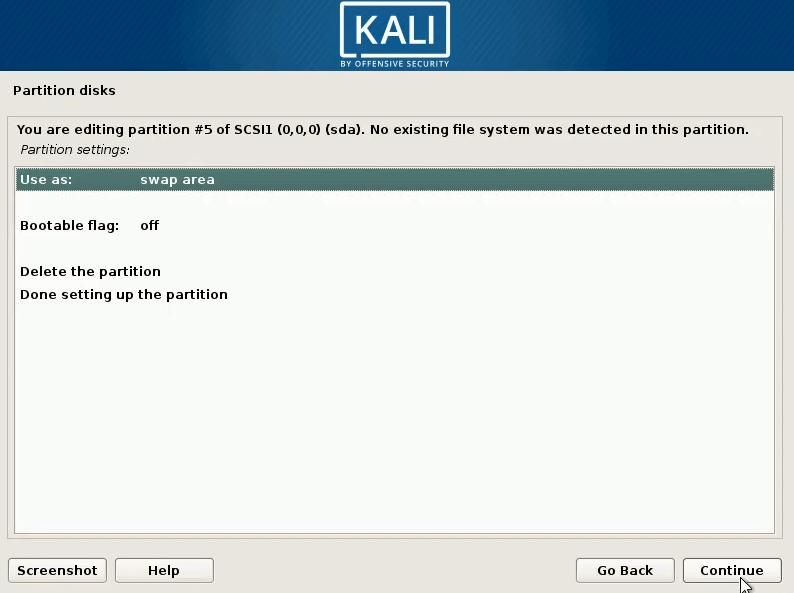
now after selecting the partition extension, it will return to the partition edit screen. now select the last option – Done setting up the partition and continue.
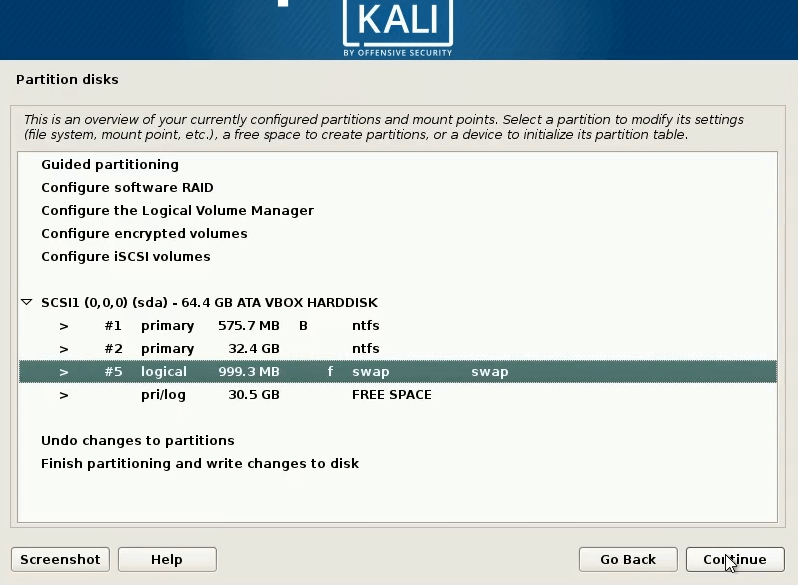
now it will again come to the beginning of the partition disk screen. the last listed partition is again a partition with label Free space. We’re going again to use that one to install our Kali Linux system. now we need to create a swap partition with that free space. We can do the same process as we did for the swap partition but here’s a simpler option. We will again choose the free space partition and continue.
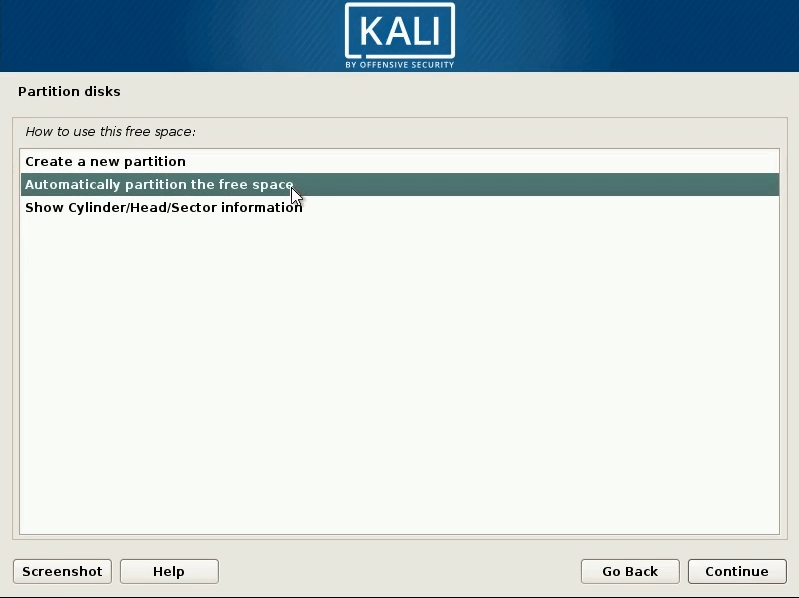
this time choose– automatically partition free space. This option, as its name says, will automatically do the entire formating process for us for our system partition.(just a little bit of time-saving)
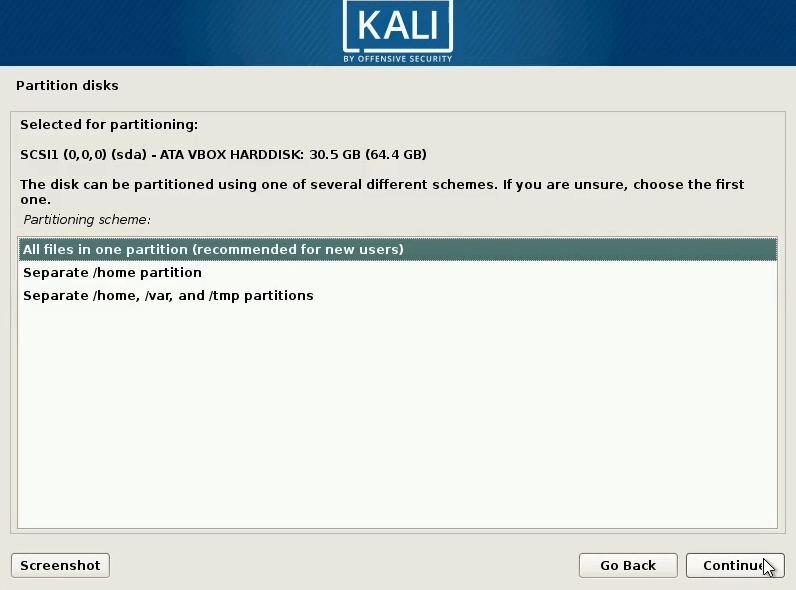
here it’s basically asking how it will format the partition. Will it format everything as one partition and all use directories save there, or to separate each user directory as a separate partition.
here select the first option – All files in one partition (since it’s recommended for new user), and continue
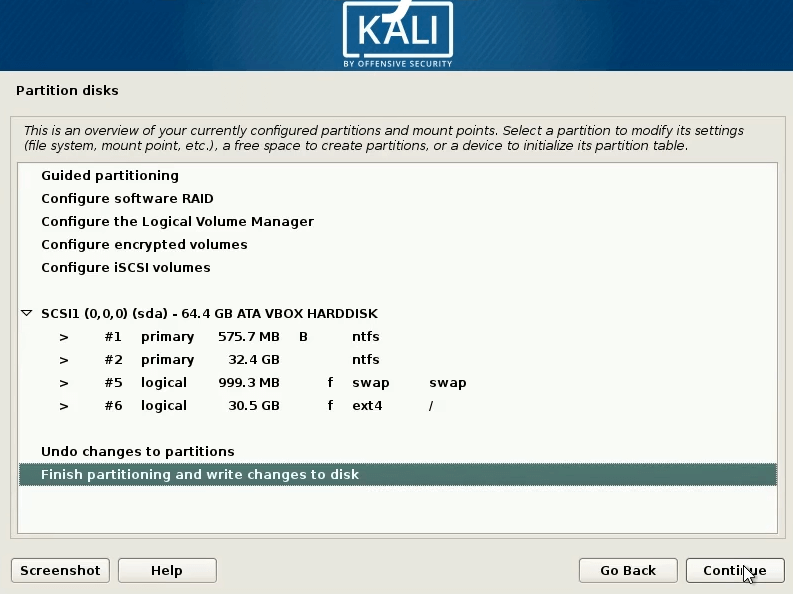
now this is it, all the partition stuff is completed, now choose “finish partitioning and write changes to disk” and continue.
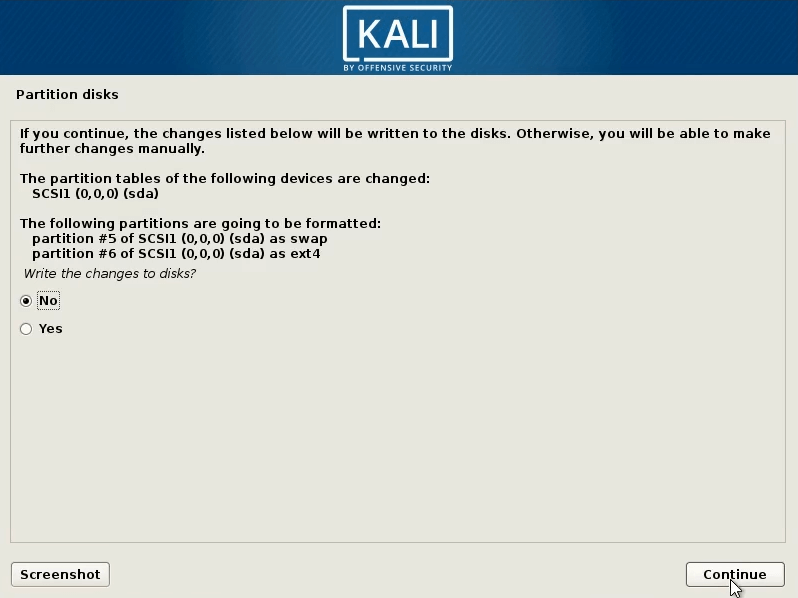
select yes and continue
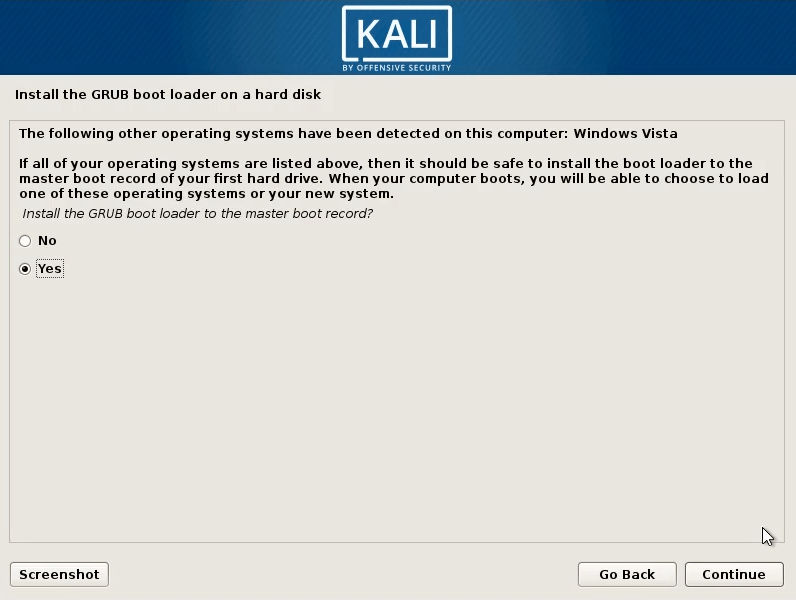
this is an important step, The setup for the GRUB bootloader installation (dual boot ). here the installation prompted us that it has detected another operating system and it is asking us do we want to install the GRUB bootloader. again select yes and continue.
GRUB is basically a package that helps you to use one of multiple operating systems.
GNU GRUB (short for GNU GRand Unified Bootloader, commonly referred to as GRUB) is a boot loader package from the GNU Project. GRUB is the reference implementation of the Free Software Foundation‘s Multiboot Specification, which provides a user the choice to boot one of multiple operating systems installed on a computer or select a specific kernel configuration available on a particular operating system’s partitions.
source: wikipidea
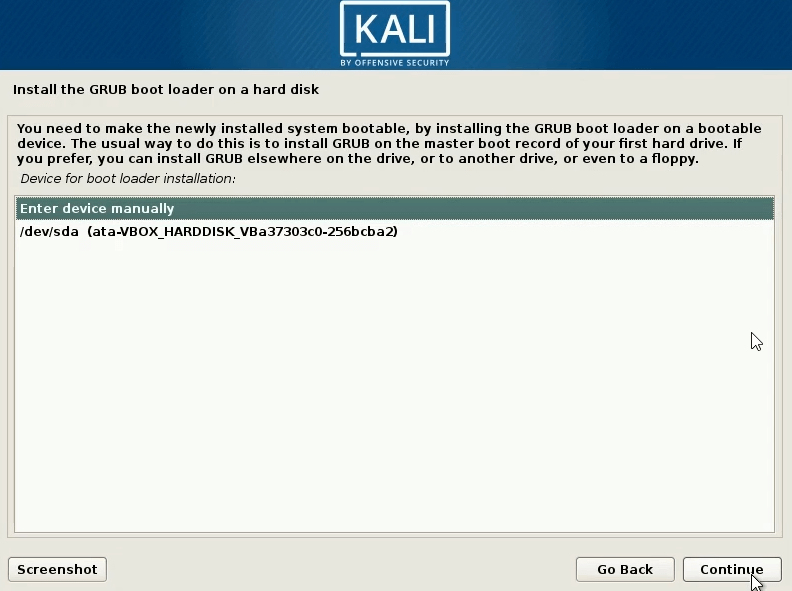
now we have to select on which hard disk we want to install the GRUB bootloader since there is only one,
select the that HDD and continue
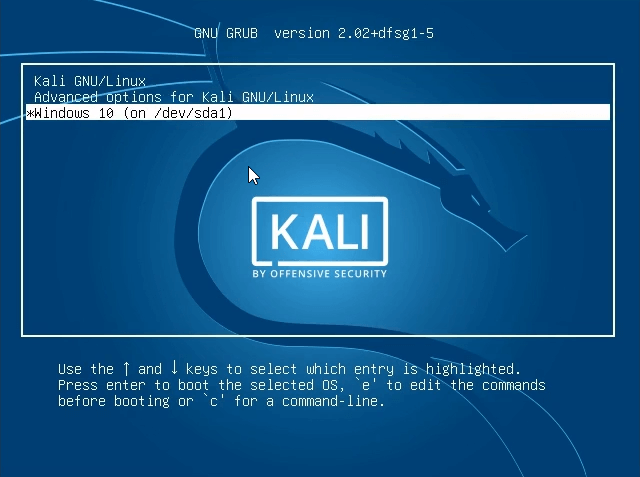
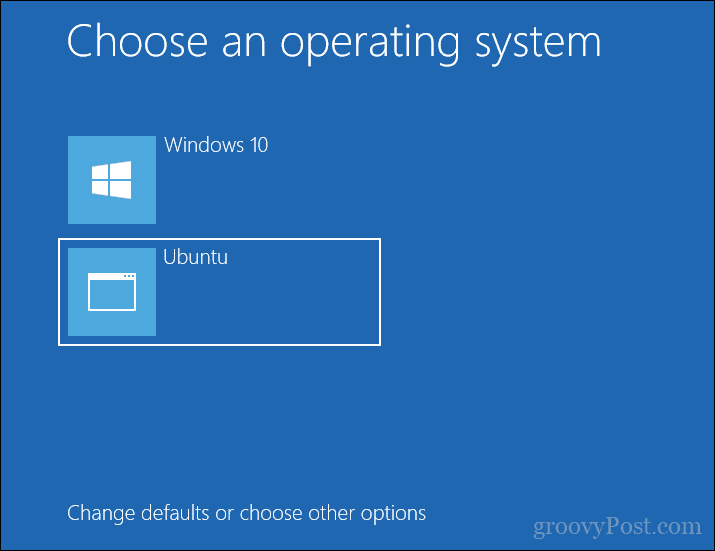
now GRUB installation is done, the Kali Linux installation will be completed as well. After that, remove the bootable USB if you want and restart the PC. When the PC starts booting, GRUB bootloader needs to boot first and offer you the option to boot Kali Linux and Windows 10 as well(picture above). If you see this screen and you have all the boot options, that means that you’ve successfully installed Kali Linux and set up the dual boot as well.
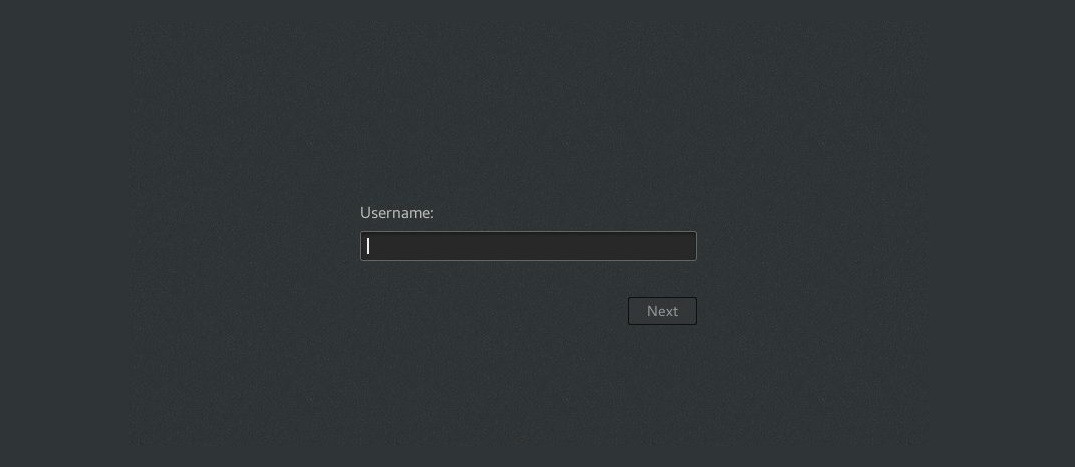
now you’ll see a login screen. (most probably your username will be root)

enter the hostname and password and click continue
that’s it you have successfully installed Kali Linux.


Found your article interesting to read. I can’t wait
to see your article. Good Luck for the upcomingupdate.
Thiss article is truly quite interesting and effective.
King regards,
Harrell Zacho
Thanks for the overall great article but there is a glaring error.
Dual booting will NOT affect your RAM.
As you have correctly stated, all you are doing is selecting which OS to choose to boot. You are not running both OSes at the same time, therefore the RAM used is attributed only to the OS you have chosen to run.
Booting one OS and then running another OS ‘inside’ the booted OS as a virtual machine WILL of course use more RAM.