( FIXED ) file explorer preview pane not working for pdf in windows

File Explorer is a Windows built-in tool with a preview pane. Is the preview pane not working in your windows for pdf files? Don’t worry, This post from windowsground tells you how to get rid of the “preview pane not working in windows for pdf files issue. Now, keep on reading
A feature of Windows File Explorer is the Preview Pane, which displays a preview of the selected file. A preview lets you see what the files contain before opening them. File Explorer’s Preview Pane displays previews for a variety of files, including Office-related documents, PDFs, text files, images, and videos. The preview of files usually works without any issues, but there are times when it does not. In recent days, many Windows 11 users have complained that the Preview Pane in File Explorer isn’t working and that they can’t see file previews.
If you are facing the problem of Preview Pane not working on your Windows computer, Then, go ahead and read this article. Here, we have compiled a list of troubleshooting methods that can help you fix the Preview Pane on your PC.
Also read: How to markup or annotate a pdf on windows
Table of Contents
[Fixed file explorer preview pane not working for pdf in windows
Make sure preview pane is enabled in file explorer
windows file explorer by default comes with disabled preview pane, so make sure you have enabled it, to enable the preview pane in windows 10 or 11 follow the steps below:
- Open file explorer by pressing [windows] + E
- Click on view
- Then from the list of dropdowns click on show
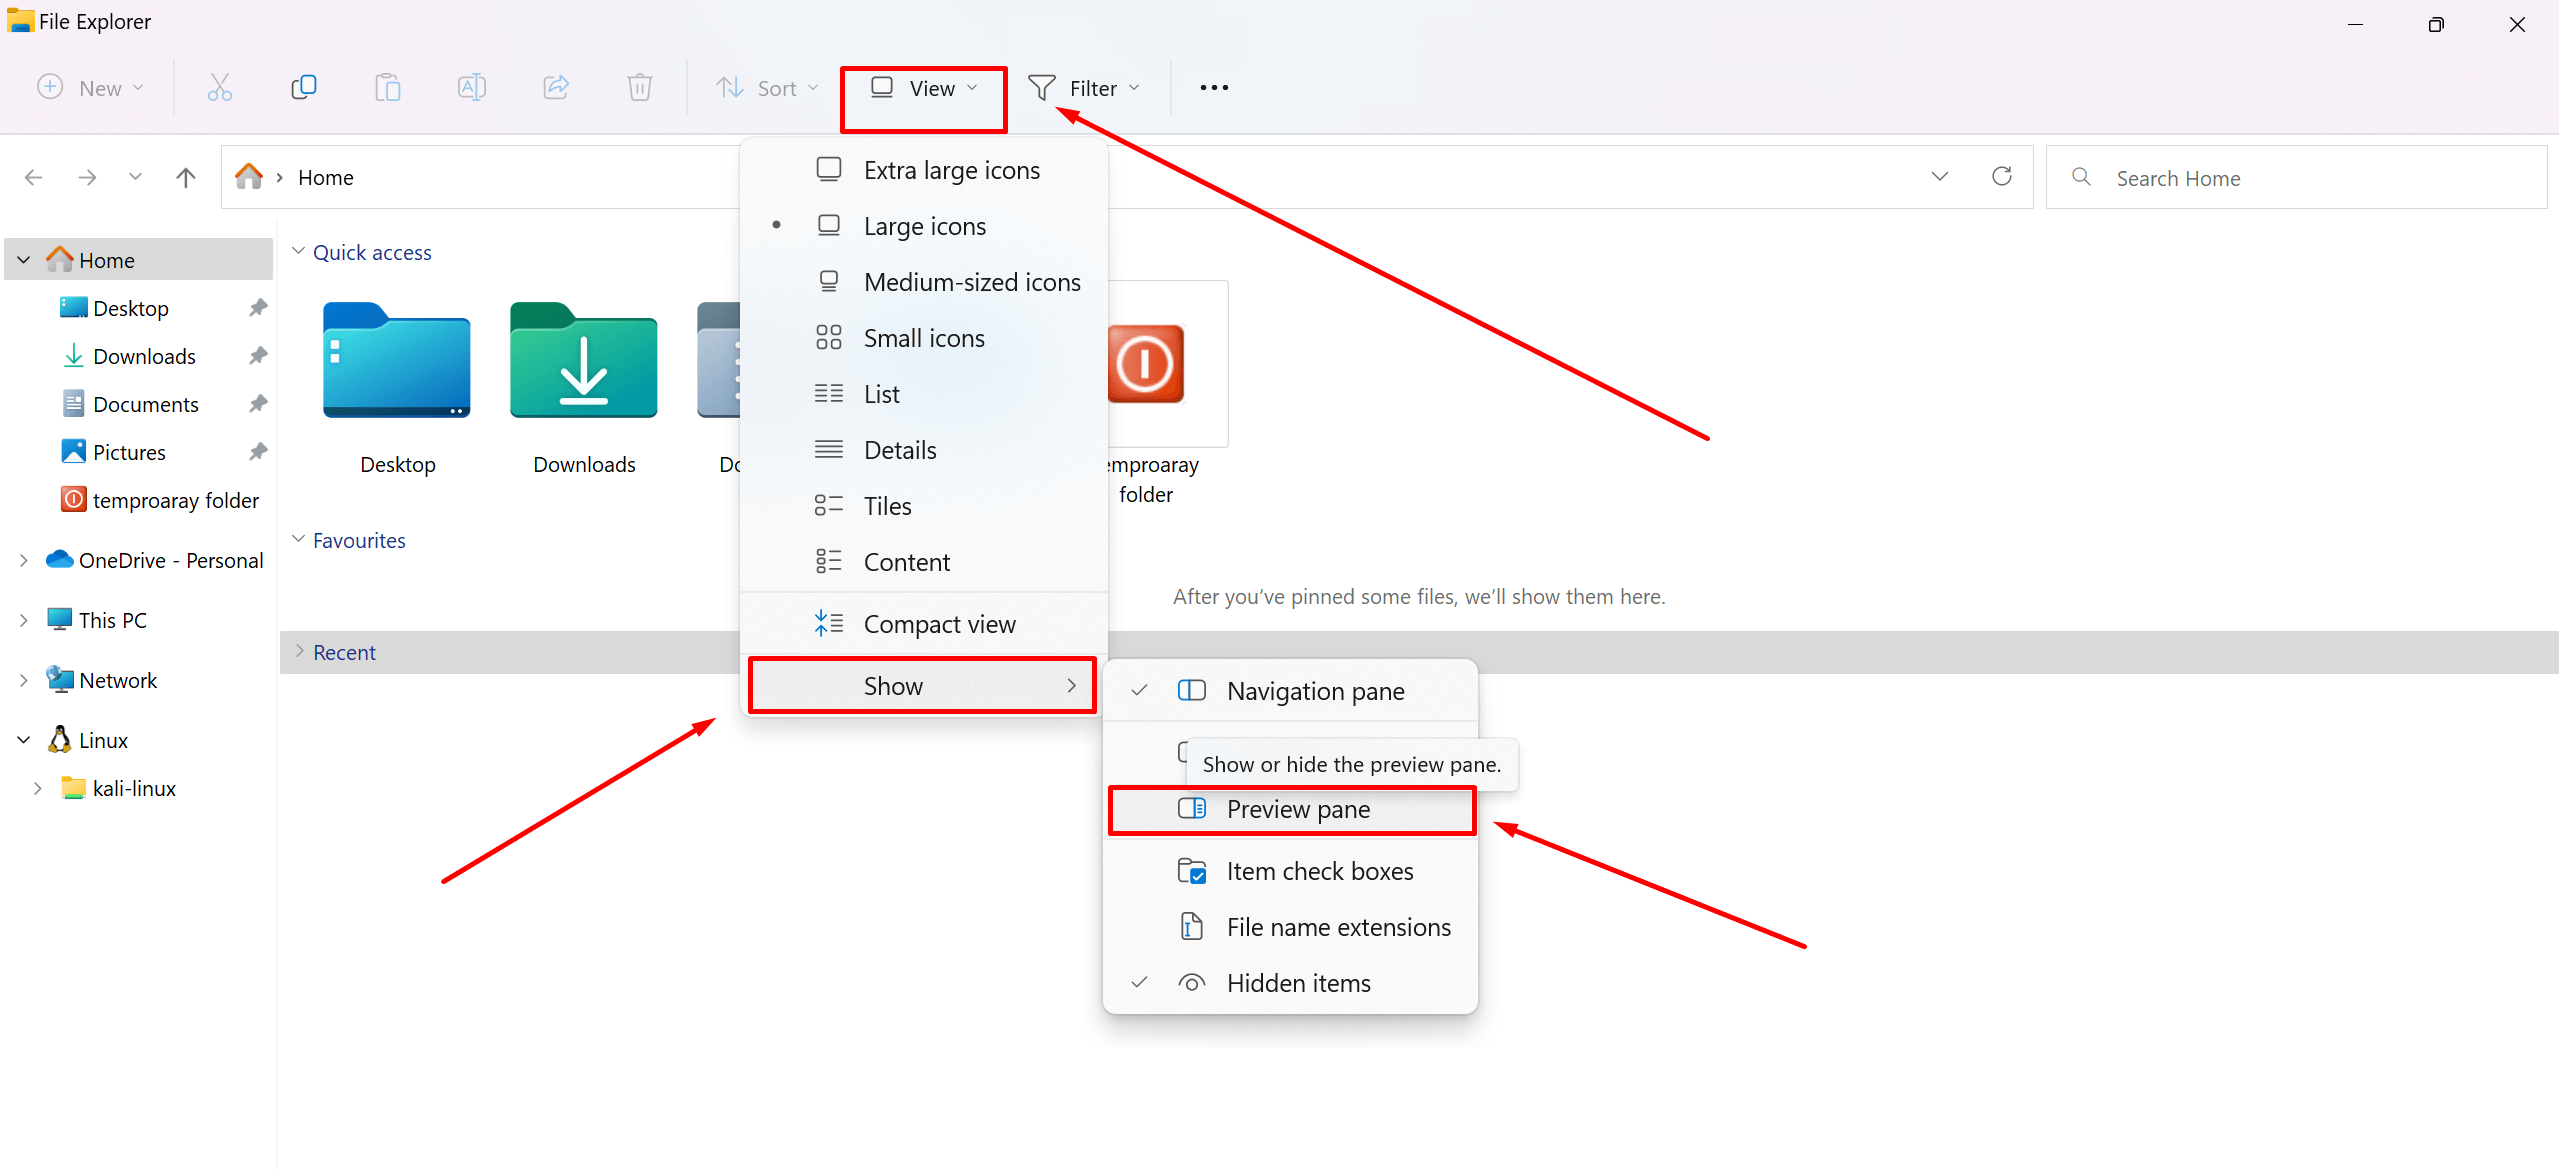
- Then from the list of drop down click on the preview pane to enable it.
And then you will notice an empty surface on the right side of your file explorer, where if you select any text, pdf or image file you will be able to see what is inside of them on that right side.
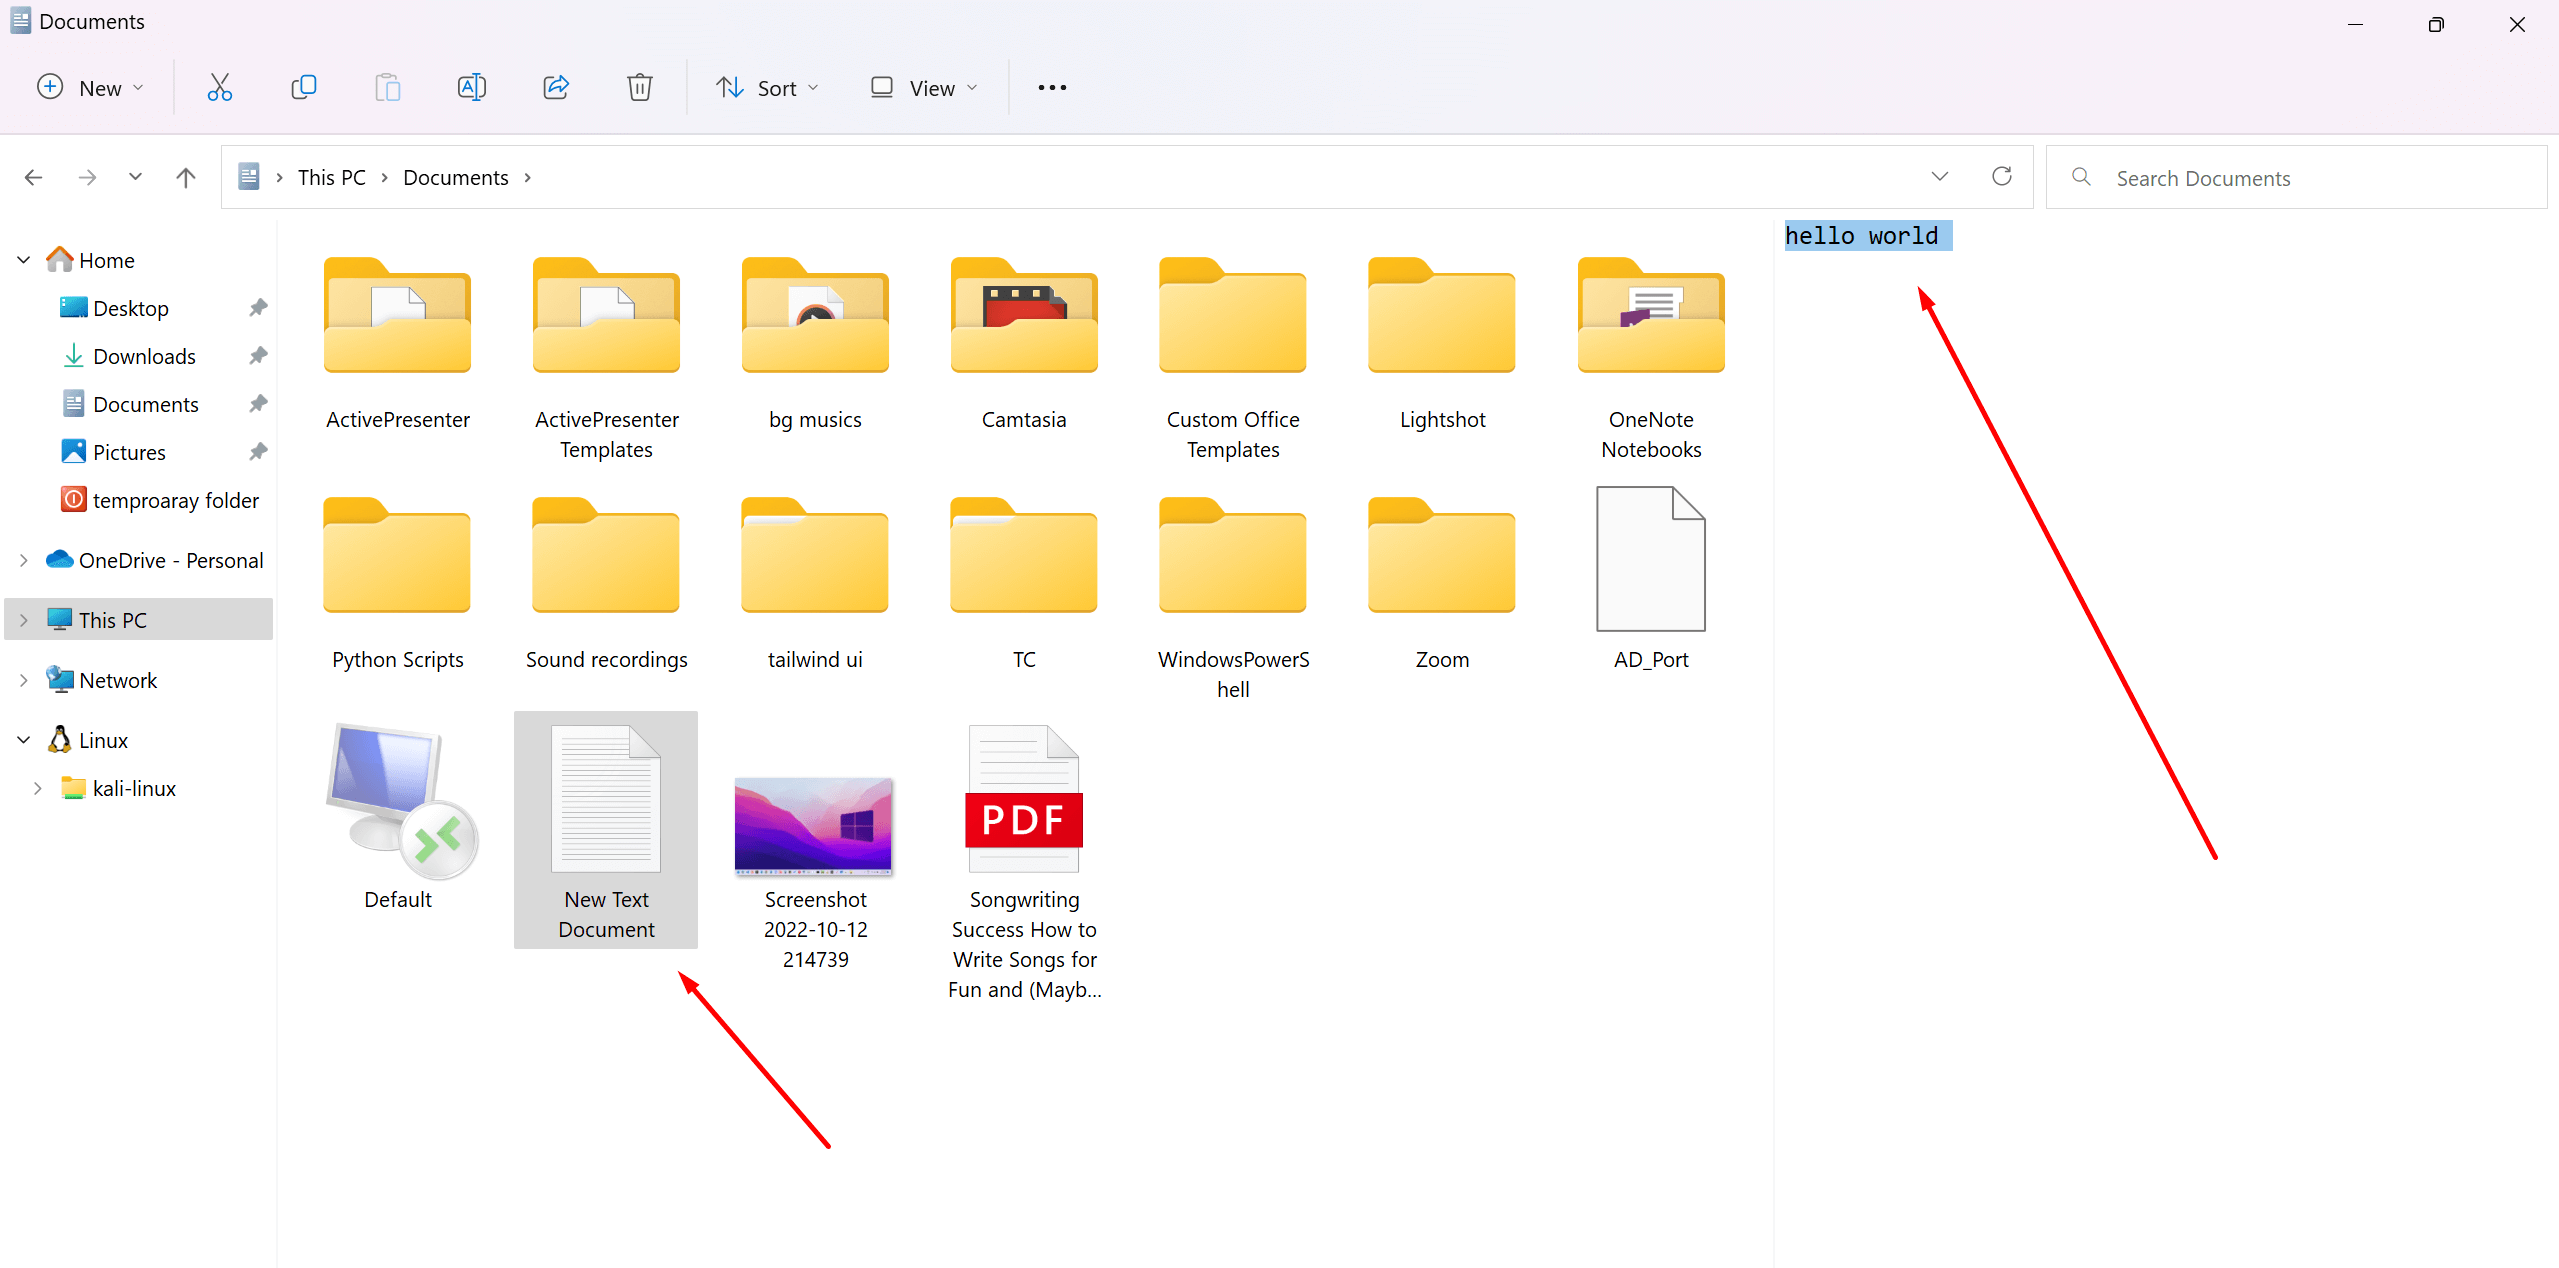
You can also watch this video to enable preview pane in file explorer in windows 11
Also read: How To Password Protect a Pdf in Windows for free
Enable Preview Handlers
- Open file explorer by pressing [windows] + E
- Tap on the three horizontal dots at the top next to View to see more options.
- In the menu that opens, select Options to see the Folder Options window.
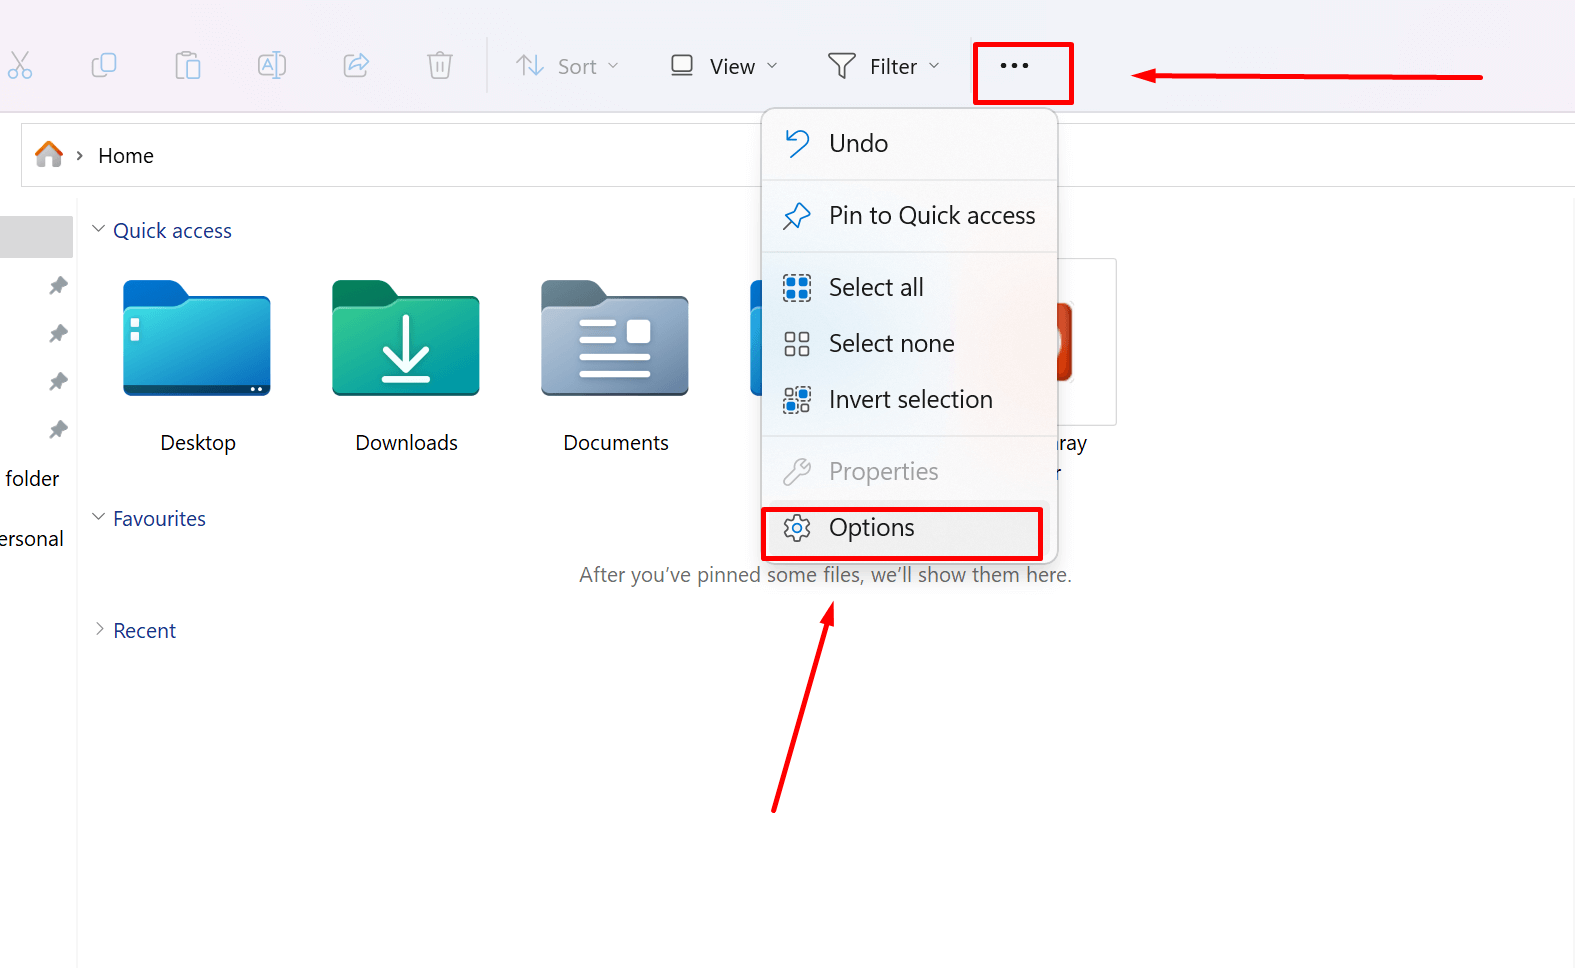
- Choose the View tab.
- In the Advanced settings section, under the heading Files and Folders, check the option Show preview handlers in the preview pane.
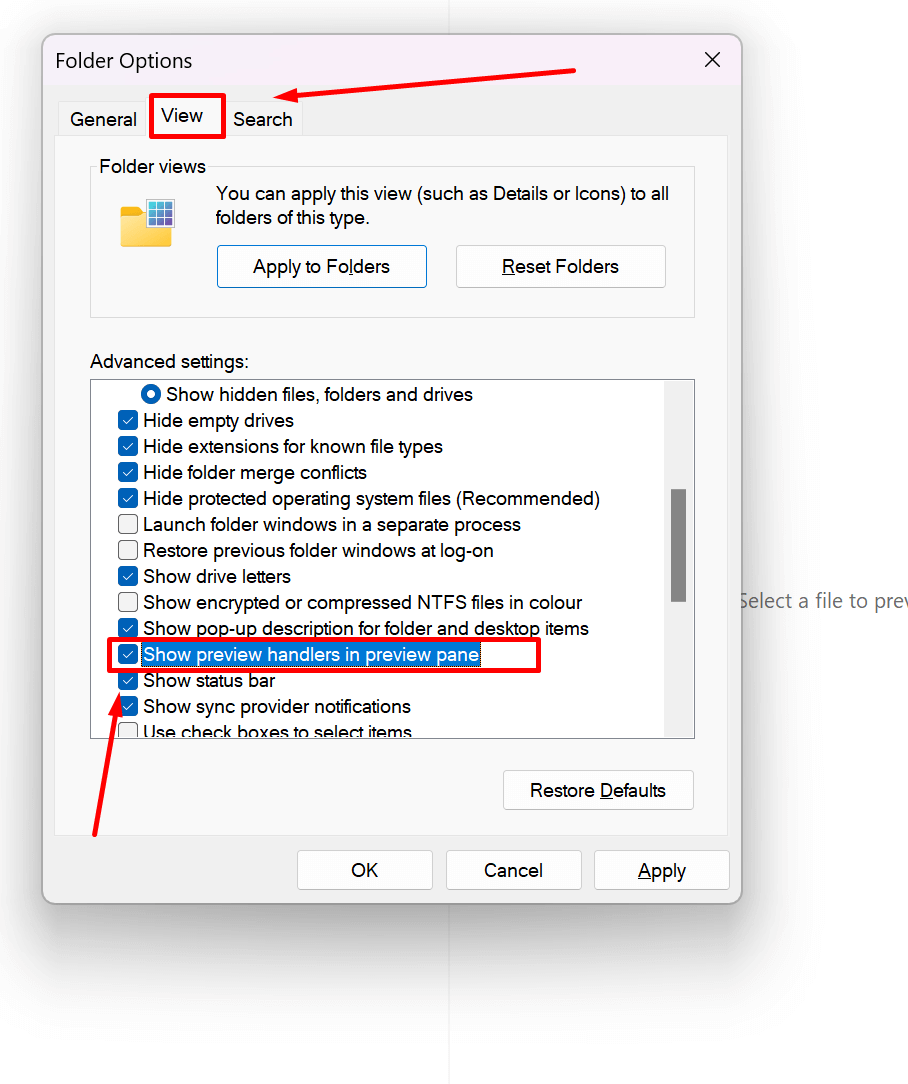
- Click on Apply and then on OK to save the changes.
- Restart the File Explorer to check if the preview pane is working or not.
Hopefully this should work, if it doesn’t try the next fix.
Related: How to ombine multiple PNG files into one PDF in windows (FAST)
Uncheck Always show icons, never thumbnails.
- Open file explorer by pressing [windows] + E
- Tap on the three horizontal dots at the top next to View to see more options.
- In the menu that opens, select Options to see the Folder Options window.

- Choose the View tab.
- Make sure the checkbox Always show icons, never thumbnails is unchecked.
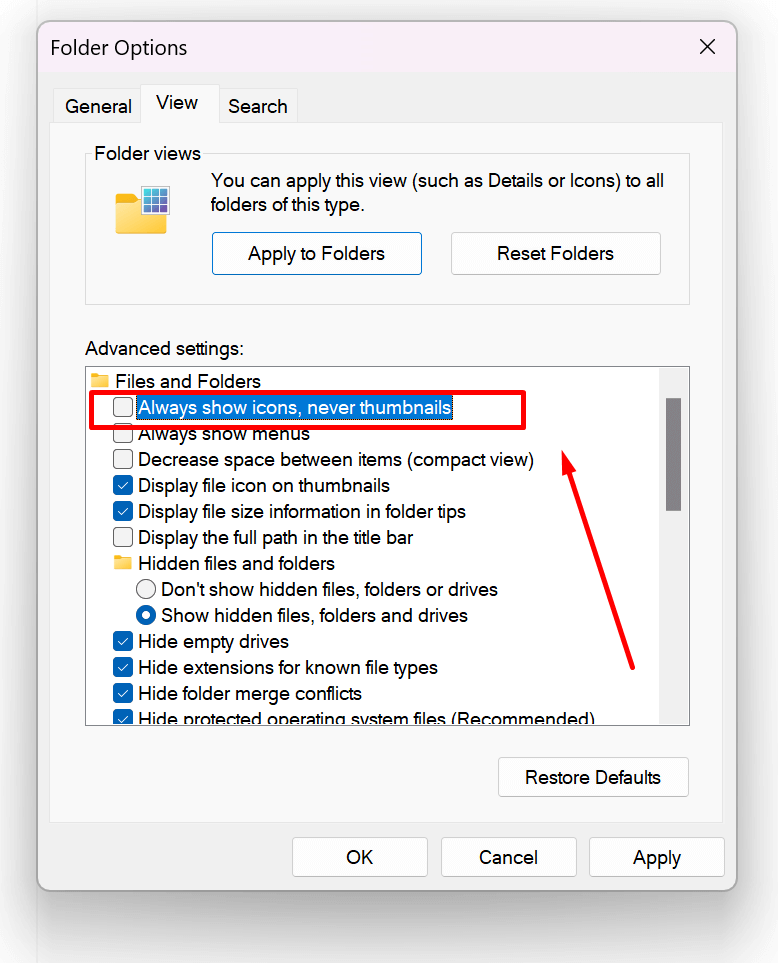
- Click on Apply and then on OK to save the changes.
- Restart the File Explorer to check if the preview pane is working or not.
Also read: ( FIXED ) file explorer preview pane not working for pdf in windows
Configure windows file explorer to with this pc view by default
When File Explorer was opened in Windows 7 and Windows 8, users had the option of selecting the ‘Computer’ or ‘This PC’ view, respectively, which displayed their home folders, local drives, and network locations. However, File Explorer now opens by default in the new ‘Quick Access’ view in Windows 10 and Windows 11. Similarly to the ‘All My Files’ option in Mac OS, the Quick Access view shows users the frequently accessed folders and documents.
Many windows users have suggested that changing file explorer to open with this pc view by default has solved the preview pane not working for the pdf issue.
So to Configure windows file explorer to open with this pc view by default, follow the steps:
- Open file explorer by pressing [windows] + E
- Tap on the three horizontal dots at the top next to View to see more options.
- In the menu that opens, select Options to see the Folder Options window.
- under the General tab, choose This PC instead of Quick Access.
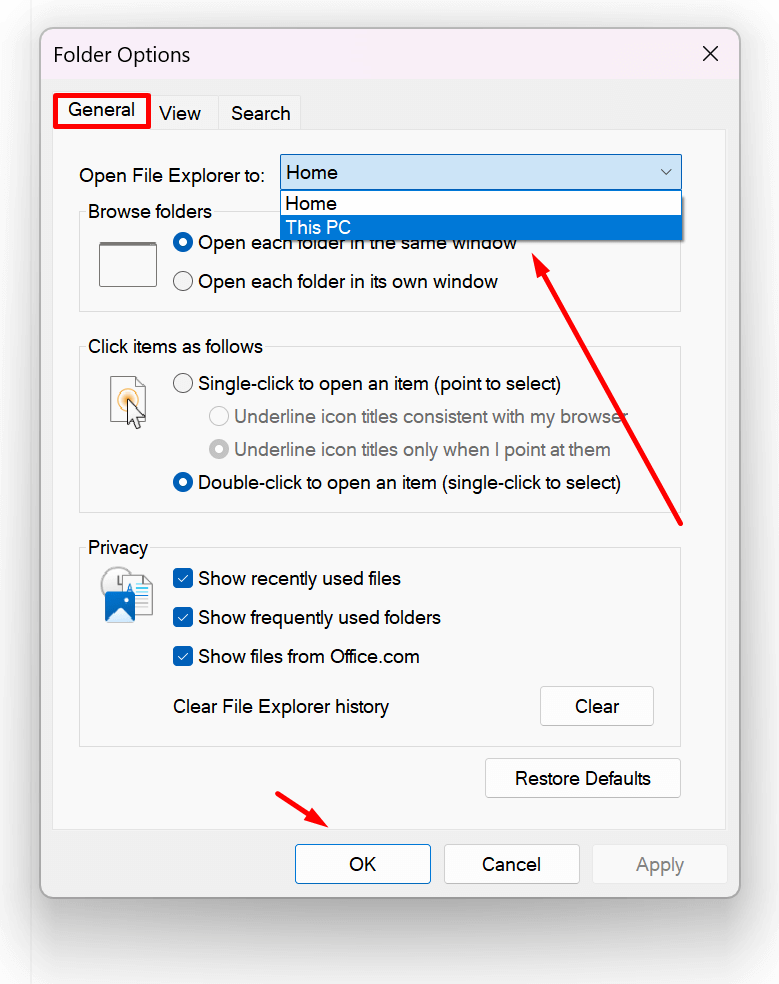
Once you have customized the above settings, click Apply and OK. Consider restarting the File Explorer after changing the folder options settings.
If these tweaks do not resolve the issue, there may be problems with the operating system.
Also read: How to combine or merge pdf files in windows (Latest tools)
Perform a System File Checker (SFC) Scan
Corrupt system files can cause problems in Windows 10 or 11. By running an SFC scan, you can easily fix them. Here are the steps to perform a SFC scan:
- Open Run using the Windows and R key combination.
- Type cmd and press Ctrl + Shift + Enter to run the Command Prompt as an administrator.
- Type the command sfc/scannow and hit Enter to execute it.
- Wait for some time until the scan completes. It will check for any corrupt files and repair them
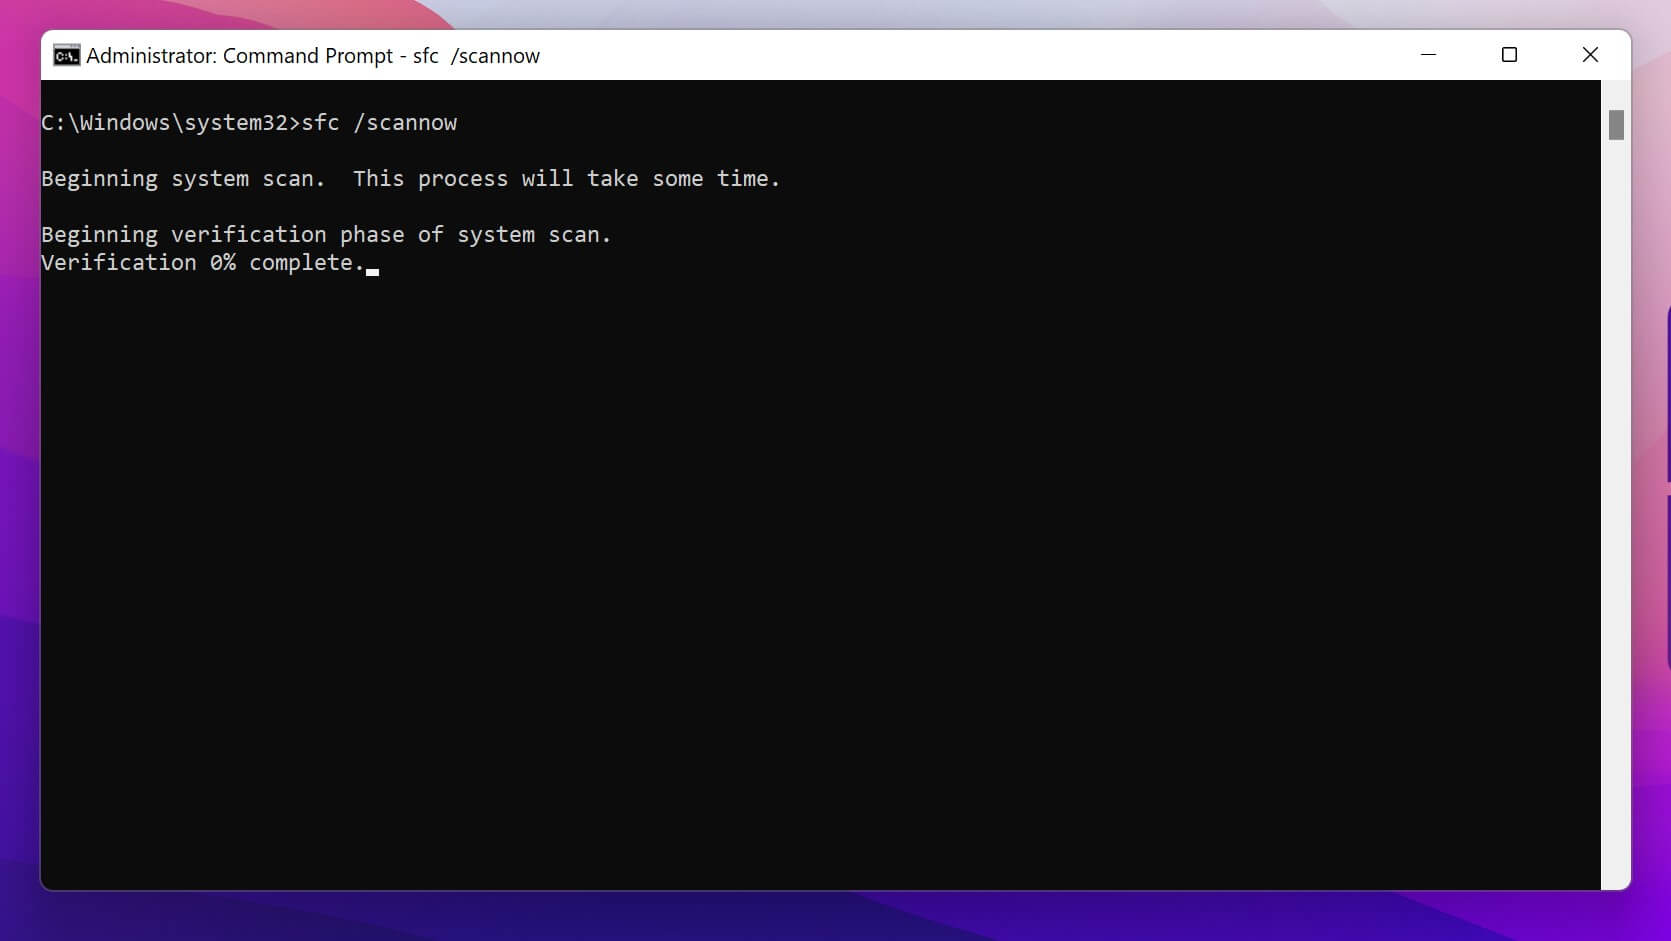
- Reboot your system after the scan. Check if the problem is fixed after the system startup.
Note: The scan may take at least 15 minutes to complete. Kindly be patient and do not close the window.
Enjoying Reading? You might like these too :
[latest_posts_by_category category=”windows PDFs”]
Reset windows File Explorer Settings
It might be a good idea to reset your Windows File Explorer if none of the above fixes worked for you. Resetting Windows File Explorer can restore all the default settings.
To reset your windows file explorer follow the steps carefully:
- Press Windows + R to open Run.
- Type control folders and hit Enter to open the Folder Options.
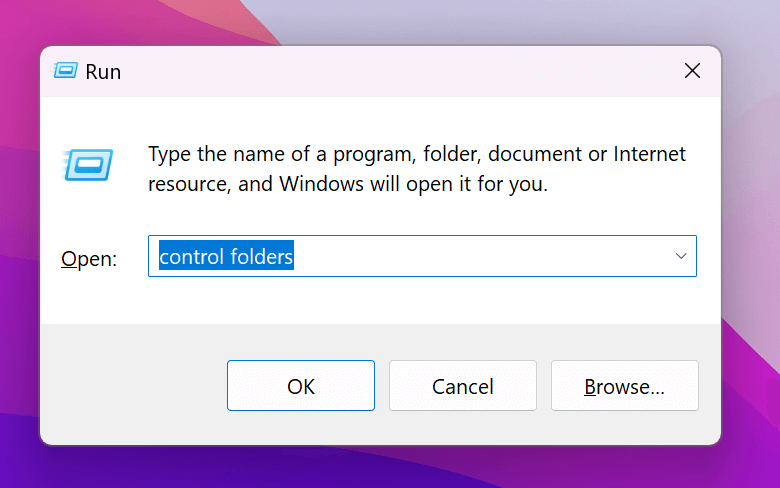
- In the General tab, click on the Restore Defaults button to reset the general settings.
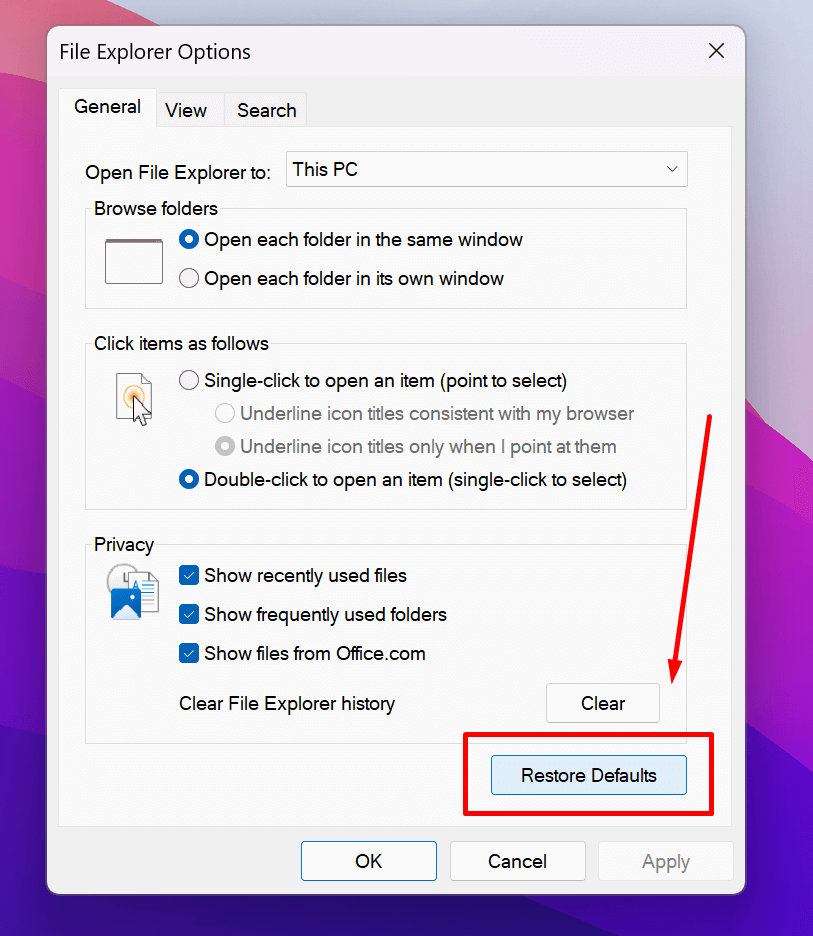
- Select the View tab. Here, click on Restore Defaults to reset the File Explorer Advanced settings.
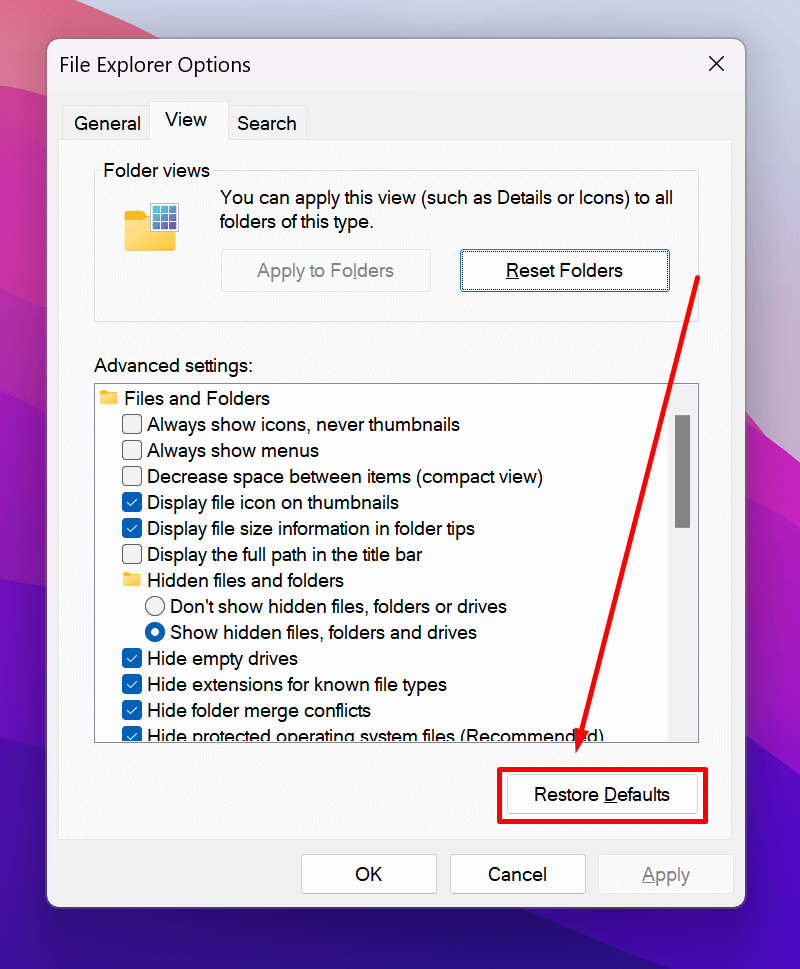
- Click on Apply and then OK.
Restart the File Explorer and check if the issue is fixed.
Also read: How to Screenshot Netflix or amazon prime video Without black screen in windows
Change System Performance Mode in Advanced System Settings
If the above solution didn’t work for you try changing the system performance to “Adjust for best appearance.”.
Change System Performance to Adjust for best appearance. Follow the steps below:
- Press Windows + R to open the Run dialog.
- Type sysdm.cpl and hit the Enter key to open System Properties.
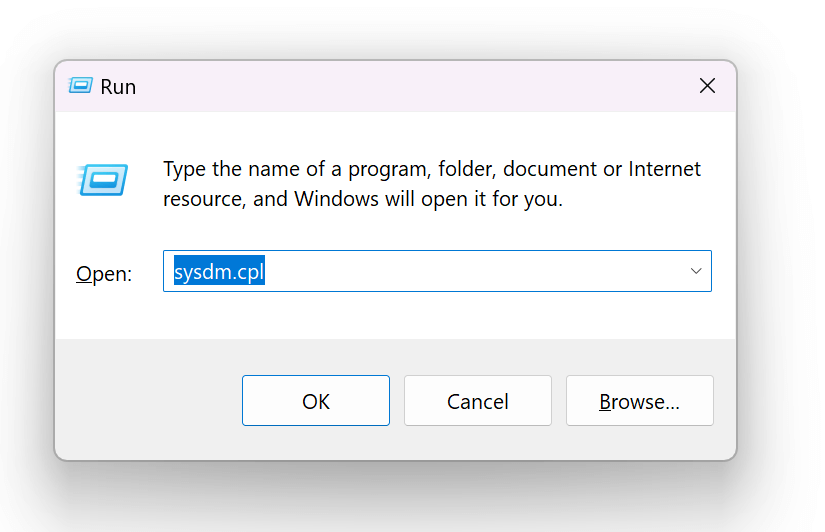
- In the System Properties window, choose the Advanced tab.
- Now, click on the Settings button in the Performance section.

- In the Performance Options window, make sure that you are in the Visual Effects tab.
- Here, select the option Adjust for best appearance.
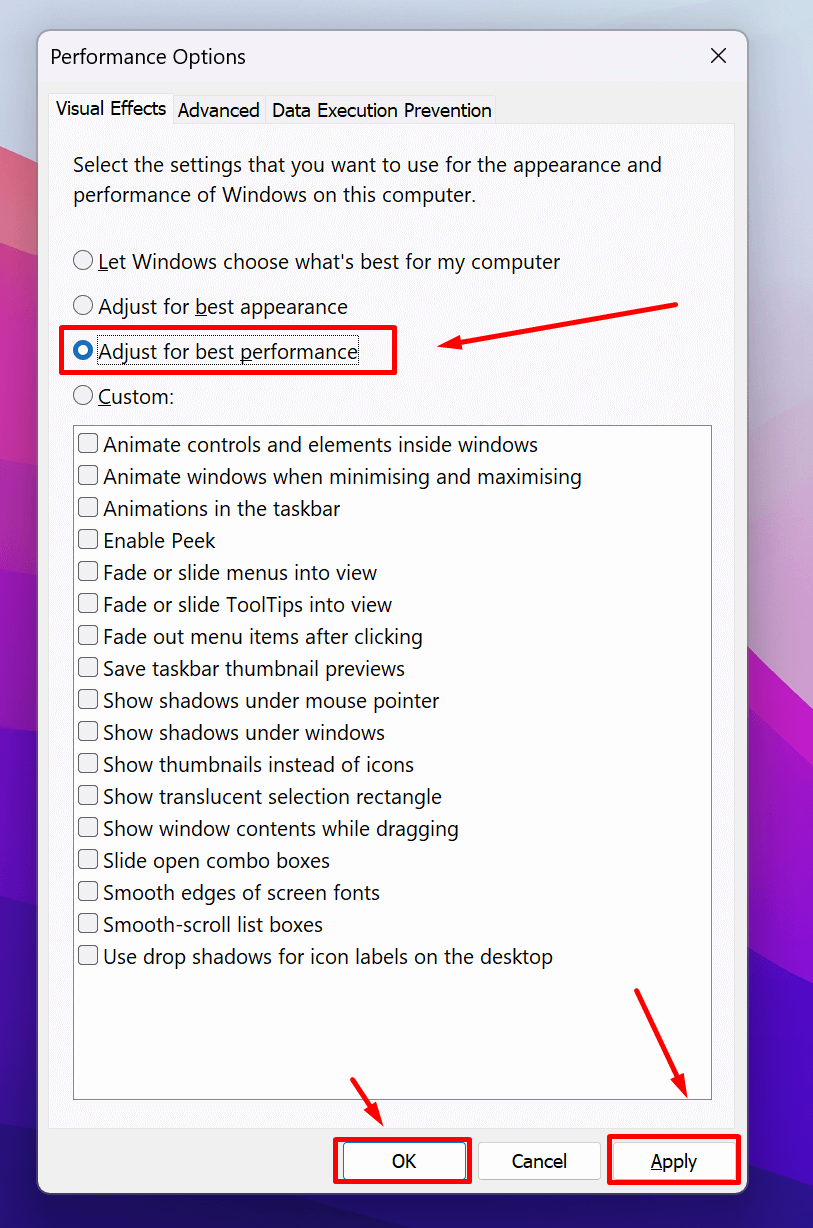
- Click on Apply and then on OK.
Restart File Explorer to check if a preview of the files is visible.
If none of the fixes mentioned in the article worked and you are still unable to view the preview pane, then try some alternative third-party apps from the Store like QuickLook. Such applications will allow you to have a preview of the files.
Download third party app QuickLook for file preview
In case resetting File Explorer also doesn’t come to the rescue, you can use the QuickLook app for the same purpose. It’s a third-party app that shows the file’s preview when you hit the spacebar. Interestingly, it supports more file formats as compared to the Preview feature in Windows 10.
you can also use File Viewer Plus 4 instead of QuickLook app
Out of various options, File Viewer Plus 4 is the best app for document previewing. A free version of File Viewer Plus supports 200 file formats, and a premium version supports 400.
Download: File Viewer Plus 4
Final Words
Is this article helpful in resolving the Preview Pane Not Working issue? We hope that you can now preview your files in File Explorer. Let us know what fix worked for you in the comments section below. To summarize, this post has shown 5 ways to fix the “Windows 10 preview pane not working” error. Try these solutions if you encounter the same error.
Team windowsground
Enjoying Reading? You might like these too :


![[Still working in 2023] activate windows 10/11 using command line free without key 32 [Still working in 2023] activate windows 10/11 using command line free without key](https://windowsground.com/wp-content/uploads/2020/01/How-to-activate-windows-10-with-command-line-CMD-1.png)


One Comment